Saturday, October 23, 2010

Week 7: Scanography

1. One Shot


1. Beauty Tools; 10.24.2010; 4:30 p.m.; Rexburg, ID; Epson Scanner;
Sized in Photoshop

For this picture, I placed these hair and makeup tools on the Epson Scanner in the Spori Lab. I placed a blanket behind the scanner and previewed the image. I then rearranged the items until I had them looking the way I wanted. Then, I played with the levels, image adjustment, and tone correction, on the scanner settings. Next, I hit scan and saved the image as a jpeg. Finally, I opened it in Photoshop to crop and size the image.

2. Collage


1. Dirt; 10.23.2010; 10:30 a.m.; Rexburg, ID; Epson Scanner;
Sized in Photoshop
2. Leaves; 10.23.2010; 10:45 a.m.; Rexburg, ID; Epson Scanner;
Sized in Photoshop
3. Twigs; 10.23.2010; 11:00 a.m.; Rexburg, ID; Epson Scanner;
Sized in Photoshop

I used the Espon Scanner in the Spori Lab to take the first three images. For the dirt, I placed saran wrap over the scanner then I put dirt on the wrap. I used a stick to write the word "earth" in the dirt. The other two images I took by placing the items directly on the scanner and covering them with my jacket. I played with the levels, image adjustment, and tone correction settings in the scanner software before scanning each picture. To make the scan collage, I opened the dirt image in Photoshop and copied the layer. I used the overlay mode on the dirt layer. Then, I placed the leaves on top of this layer and used the hard light setting. For the twigs, I used the quick selection tool to only select the twigs. Then, I placed just the twigs in a layer on top of the leaves and set the twig layer to the
darken mode.  


Friday, October 22, 2010

Week 7: Edge Effects

1. Flexible Vignette


1. Swing; 10; 15; 2010; 4:30 p.m.; Rexburg, ID; f/3.2; 1/640;
Sony DSC-H7; Edited in Camera Raw and Photoshop

For this photo, I first increased the contrast, vibrance, brightness, clarity, and sharpness in Camera Raw. Then, I opened the image in Photoshop. In Photoshop, I copied the layer, and then cropped the photo. Next, I hit shift-command-N to add a new blank layer. Then, I set the foreground and background colors to default and inserted the foreground color into the new layer. I used the rectangular marquee tool to draw a box, about an inch from the edge, inside the image. I then hit the delete tool to create an opaque border. Finally, I reduced the opacity on this layer to about 70 percent and increased the feathering to about 50 percent.

2. Double Fade Border


2. Barber Chair; 9.29.2010; 1:33 p.m.; Bannack, MT; f/3.2; 1/200;
Sony DSC-H7; Edited in Camera Raw and Photoshop

I first increased the contrast, fill lights, recovery, clarity, and vibrance of this photo in Camera Raw. I then opened the image in Photoshop and added the edge effect. For the edge effect, I copied the layer and cropped the picture to 9 by 7 inches. Then, I went to image-canvas size to add on an inch to the height and width and to select the extension color. The extension color was taken from the chair. Next, I used the rectangle tool, on shape layer, to draw a black, not white, rectangle about .25 inches in from the edge of the image. Then, I added a mask to the shape layer. In the mask, I drew another rectangle .25 inches in from the first rectangle. For this rectangle, however, I selected fill pixels. Next, I reduced the opacity of this layer to 60 percent. Finally, I used the motion blur filter on the shape layer twice. The first time, I added 45px to the distance, but didn't change the angle. The second time, I changed the angle to 90 and left the distance at 45px.

3. Flexible Brushed-on Effect


1. Horses; 9.29.2010; 9:55 a.m.; Dubois, ID; f/5.0; 1/640;
Sony DSC-H7; Edited in Camera Raw and Photoshop

I used Camera Raw to increase the vibrance, clarity, sharpness, and contrast of this photo. Then, I opened the image in Photoshop. In Photoshop, I copied the layer and hit shift-cmd-N to add a new layer. I hit D to set the colors at default. Then, I hit cmd-delete to fill the new layer with white. Next, I dragged the image layer above the white layer. On this layer, I hit the alt key to add a black layer mask. Finally, I loaded the think heavy brushes and used the brush tool to paint back the image. I rotated between brushes 3, 2, and 5 and played with the opacity to get this effect.

Saturday, October 16, 2010

Week 6: Enhancements

1. Portrait Enhancements


1. Olivia; 10.15.2010; 1:55 p.m.; Rexburg, ID; f/3.2; 1/125;
Sony DSC-H50; Edits in Camera Raw and Photoshop

This picture was taken outside of the library. Olivia is Brother Olsen's, a school librarian, daughter. She had just eaten a snack when I asked if I could take her picture. So, she had food all over her mouth. To edit this picture, I opened it in Camera Raw. Then, I added recover, fill lights, contrast, clarity, and vibrance. I then opened the image in Photoshop and copied the layer. In Photoshop, I had to use the clone stamp to get rid of the food marks and a scar on Olivia's upper lip. Then, to make the clone stamping more even, I copied the layer and used the brush tool to take parts of Olivia's skin color and  smooth it over her face.
2. Replace Color


1. Laurence; 10.15.2010; 1:30 p.m.; Rexburg, Idaho; f/3.2; 1/800;
Sony DSC-H50; Edits in Camera Raw and Photoshop

Laurence is a nice, but shy guy. He wasn't up for taking a candid shot. He only really felt comfortable doing posed shots in front of a plain background. Unfortunately, the only plain wall around was a wall that matched the color of Laurence's shirt. So, I decided to use this picture for my color replacement photo. To edit this photo, I first opened it in Camera Raw. I increased the contrast, clarity, vibrance, and sharpness. Then, I opened the image in Photoshop. In Photoshop, I copied the layer. Then used the quick selection tool to select just the shirt. Then, I went to image-adjustment-replace color. I clicked on Laurence's shirt in the screen and I increased the fuzziness slider to 100. I then changed the color using the hue and saturation sliders in this palette.

3. Match Color


1. Caleb with Backpack; 10.15.2010; 1:47 p.m.; Rexburg, Idaho; f/3.5; 1/125;
Sony DSC-H50; Sized in Photoshop
2. Caleb's Smile; 10.15.2010; 1:44 p.m.; Rexburg, Idaho; f/2.8; 1/320;
Sony DSC-H50; Sized in Photoshop

These pictures were taken outside of the library. I really liked the second photo a lot more than the first because the lighting and color was better in this shot. I also liked Caleb's smile. Caleb, however, hates this picture and claims that it makes him look funny. So, I decided to replace the color on the first photo with the color from the second photo. To do this, I opened both photos in Photoshop. Then, I selected the first image and went to image-adjustments-match color. In this palette, I selected the second photo as the source photo, and I used the fade slider to slightly fade the effect. I also added luminance to the image with the luminance slider in this palette.

Week 6: Portraits


1. Caleb; 10.16.2010; 4:08 p.m.; Rexburg, ID; f/2.8; 1/640;
Sony DSC-H50; Photo edited in Camera Raw
2. Kathleen; 10.14.2010; 1:33 p.m.; Rexburg, ID; f/2.8; 1/80;
Sony DSC-H50; Photo edited in Camera Raw
3. Jessica; 10.14.2010; 2:15 p.m.; Rexburg, ID; f/3.5; 1/160;
Sony DSC-H50; Photo edited in Camera Raw
4. Merritts; 10.16.2010; 4:04 p.m.; Rexburg, ID; f/2.8; 1/200;
Sony DSC-H50; Photo edited in Camera Raw

The picture of my husband Caleb was taken outside of Craigos in front of a random bus. I edited this photo in Camera Raw by increasing the fill lights, changing the contrast, adding a little vibrance and clarity, and a slight vignette. Kathleen's picture was taken in the library. The lights in this building were really hard to work with. So, for this picture, I increased the exposure in Camera Raw. I also added sharpness, clarity, and luminance in Camera Raw. Jessica's picture was taken outside of the Clark building. The picture of the Merritts was taken outside of Craigos. For both of these photos, I added fill lights, contrast, clarity, vibrance, sharpness, and a slight vignette in Camera Raw.

Friday, October 8, 2010

Week 5: Camera Raw


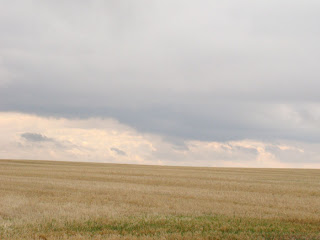
1. Farm; 10.8.2010; 2:15 p.m.; Rexburg, ID; f/8.0; 1/400;
Sony H50; Tripod used

This picture was taken in the rain. So, I had a friend shield the lens of the camera while I took the shot. To edit this photo, I opened it in Camera Raw. In Camera Raw, I first created a highlight using the brush tool over parts of the sky. Then, I added a blue color to the highlighted area. I also increased the contrast, brightness, exposure, saturation, clarity, and sharpness of the highlighted parts. Next, I increased the fill lights, blacks, contrast, clarity, vibrance, and saturation in the basic palette to the whole image. I also wanted the ground to look more yellow instead of brown, so I played with the orange and yellow color sliders in HSL grayscale to bring out the yellow color. I also increased the temperature slider to the yellow side. Then, I changed the tone curve to medium contrast. Finally, I added detail to the sharpening palette and a slight vignette to the image with the fx palette.

Challenge


1. Road; 10.8.2010; 2:12 p.m.; Rexburg, ID; f/8.0; 1/500;
Sony H50; Tripod used

This image was also taken in the rain. After taking the shot, I opened the image in Camera Raw. First, I increased the recovery and the fill shadows. Then, I increased the clarity and vibrancy. Next, I opened the image as a smart object in Photoshop by clicking the text in the bottom middle of the window in Camera Raw. In Photoshop, I copied the layer and added more blue to the picture through the color balance palette. With the color balance palette, I selected midtones and moved the first slider toward the cyan side. Finally, I masked out this effect on everything but the sky.


Week 5: Panoramic


1. Field 1; 10.8.2010; 2:06 p.m.; Rexburg, ID; f/8.0; 1/500;
Sony H50; Tripod used
2. Field 2; 10.8.2010; 2:06 p.m.; Rexburg, ID; f/8.0; 1/500;
Sony H50; Tripod used
3. Field 3; 10.8.2010; 2:06 p.m.; Rexburg, ID; f/8.0; 1/500;
Sony H50; Tripod used
4. Field 4; 10.8.2010; 2:06 p.m.; Rexburg, ID; f/8.0; 1/500;
Sony H50; Tripod used

These pictures were hard to take because I took them in the rain, and rain drops kept hitting the camera lens. Luckily, I had a friend with me, and I had him block the rain from the camera. In addition to this, I couldn't get really close to the pivot because I didn't want to go walking in a farmer's field. So, I had to use a lot of zoom. After taking these shots, I merged them together in Photoshop by going to file-automate-photomerge. After merging the photos, I cropped the image in Photoshop and then opened it in Camera Raw. In Camera Raw, I increased the recovery, contrast, clarity, and vibrance.


Friday, October 1, 2010

Week 4: High Dynamic Range

Three Shot HDR:


1. Stairs Underexposed; 9.29.2010; 5:20 p.m.; Bannack, MT; f/5.0; 1/50;
Sony DSC-H7; Tripod and timer used
2. Stairs Normal Exposure; 9.29.2010; 5:24 p.m.; Bannack, MT; f/3.5; 1/25;
Sony DSC-H7; Tripod and Timer used
3. Stairs Overexposure; 9.29.2010; 5:29 p.m.; Bannack, MT; f/3.5; 1/20;
Sony DSC-H7; Tripod and Timer used

These pictures were taken in Hotel Mead. For these picture, I used a tripod and changed the exposure. The first shot had an exposure of -2. The second shot was 0. And, the third shot was +2. I used the timer to take these shots to prevent me from bumping the camera. Then, I ran all of these photos through Dynamic Photo to create my HDR. In Dynamic Photo, I played with the different settings in the toning map. I used the eye-catching mode. Then, I increased the brightness and vivid color. Finally, I added clarity and de-haze.

One Shot HDR:


1. Blue Tank; 9.29.2010; 3:55 p.m.; Bannack, MT; f/2.8; 1/60; Sony DSC-H7;
Sizing in Photoshop

This photo was taken at the Bannack Mill. To compose this shot, I placed the lock in front of the two items. I then took the shot. Next, I ran the image through Dynamic Photo. In Dynamic Photo, I played with the different settings under the toning map. I enhanced the vivid color, brightness, and saturation. I also turned on the sky setting. Finally, I added clarity and de-haze.

Week 4: Bannack Macro Abstract


1. Lock; 9.29.2010; 4:16 p.m. Bannack, MT; f/3.2; 1/10; Sony DSC-H7;
Tripod used and editing in Camera Raw and Photoshop
2. Wood; 9.29.2010; 9:45 a.m.; Dubois, ID; f/3.5; 1/320; Sony DSC-H7;
Sizing in Photoshop

For the picture of the lock and the wood, I used macro mode and a lot of zoom. For the lock, I had to use a tripod because it was in the dark mill and the shutter speed was slow. I edited the lock in Camera Raw by decreasing the exposure and adding highlights to the wood and lock. Then, in Photoshop, I copied the layer and added sharpness by using the smart filter. I masked out the sharpness on everything but the lock and wood. Then, I added a vignette by feathering and masking another layer. The texture shot was just sized down in Photoshop. To make my macro abstract, I put the wood in a layer over the lock. Then, I went to layers and chose overlay mode and decreased the opacity. Finally, I masked out the effect on everything but the lock.

Week 4: Bannack Reverse Shallow Depth


1. Fence Background; 9.29.2010; 5:05 p.m.; Bannack, MT; f/3.2; 1/2000;
Sony DSC-H7; Editing done in Camera Raw
2. Fence Foreground; 9.29.2010; 5:09 p.m; Bannack, MT; f/3.2; 1/2000;
Sony DSC-H7; Editing done in Camera Raw

For these two shots, I used a low aperture and a lot of zoom. To blur the foreground, I focused the camera on a back fencepost and pressed the shutter in half way. I then reframed the shot before completely taking the picture. To blur the background, I did the same thing, expect I focused in first on a close fencepost. I then edited both of these shots in Camera Raw by increasing the clarity and vibrancy of each photo.
 

Week 4: Bannack Action Blur & Freeze


1. The Stove Ghost: 9.29.2010; 2:00 p.m.; Bannack, MT; f/7.1; 8; Sony DSC-H7;
Tripod used and editing done in Bridge and Photoshop
2. Splash; 9.29.2010; 2:45 p.m.; Bannack, MT; f/5.6; 1/800; Sony DSC-H7; 
Editing in Bridge and Photoshop

The first picture was taken in Hotel Mead. Josh was my model. I used a tripod and a slow shutter speed for this shot. To blur the image, I set the shutter speed to 8'', then I pushed the shutter. I had Josh move out of the shot after 4'' to blur the image. The room that this was taken in was a little too bright, so the photo was blown out. Because of this, Sister Esplin and I decided this shot would look best black and white or in sepia. To make it sepia, I first opened the picture in Camera Raw. I decreased the exposure and added contrast. Then, I opened the image in Photoshop. In Photoshop, I copied the layer and went to image adjustments to colorize the photo. For the water picture, I had someone throw a rock into the water as I took the picture. I used a fast shutter speed. This was hard to time, and the picture turned out a little dark and wasn't well focused. So, I opened the image in Camera Raw and increased the exposure. I also highlighted the water. Then, I opened the image in Photoshop and copied the layer. Next, I added sharpness to the splash by using the sharpness smart filter. Finally, I masked out the sharpness on everything but the water.

Week 4: Bannack Portraits


1. Josh; 9.29.2010; 1:40 p.m.; Bannack, MT; f/3.0; 1/80; Sony DSC-H7; 
Editing done in Bridge
2. Michelle; 9.29.2010; 1:30 p.m.; Bannack, MT; f/3.0; 1/50; Sony DSC-H7;
Editing done in Bridge

I took these two pictures in Hotel Mead. They were both by a South facing window. This was at the beginning of the day, and I hadn't quite figured out how to work the exposure on the school cameras. So, the first picture of Josh was a little washed out. I edited this picture in Camera Raw by decreasing the exposure and adding contrast and clarity. The picture of Michelle was a little dark. So, I opened this shot in Camera Raw as well, and then increased the exposure and added contrast and clarity.